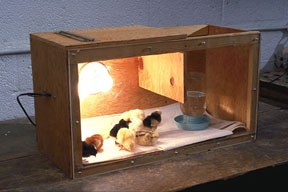
A strong and reusable brooder which is easy to build

This plywood brooder is easy and inexpensive to build. The proportions can be changed if necessary. The brooder is designed to trap heat in half of the unit to keep the chicks warm. The other half allows you to observe the chicks eating and moving about. The top above the light bulbs should be hinged to allow you to open the top to clean the brooder and catch the chicks.
Materials needed:
- Use 3/4-inch thick plywood. Three pieces of plywood, 18 inches by 36 inches each; plywood, 9 inches by 18 inches (this will be the heat trap); two pieces of plywood, 18 inches square.
- 18-inch-square chicken wire, plastic-coated wire or plastic mesh with openings 1/2 to 1 in..
- Two 2-inch hinges;
- Two insulated light sockets with cords;
- Staple gun.
- Nails.
- Newspapers, texture paper towel or fresh pine shavings;
- Thermometer.
- Waterer.
- 18 x 36 inch peice of Plexiglass for the front panel.
- Drill and wood screws to fasten plexiglass.
Building the wooden brooder:
- Nail one of the 18-inch by 36-inch pieces of plywood (the bottom of the box) to two of the 18-inch by 36-inch pieces (the sides of the box).
- Nail on the ends (the two 18-inch square pieces). You now have a box without a top.
- Looking down from above the open top, measure 18 inches from the ends on both sides. Using the light trap plywood (9 inches wide by 18 inches long) place this piece at the 18-inch mark with its edge flush with the top. Nail it along the sides. Looking down into the box, it will be divided into two halves.
- In the right half of the box, screw the insulated light sockets to each side, facing each other. (The middle of each light socket should be at the bottom of the light trap.). You may want to drill holes in the side of the box for the electric cords to go through.
- Drill a holes in each corner and every 9 to 12 inches along the edge of the plexiglass to screw the plexiglass onto the plywood frame.
- Screw the hinges onto one end of the remaining 18-inch-square piece of wood. Screw the hinges to the right end of the box. This is the hinged plywood top. The top above the light bulbs should be hinged to allow you to open the top so you can clean the brooder and catch the chicks.
- Staple or nail the 18-inch-square piece of chicken wire or mesh across the left side top of the box. Use two light bulbs on the heated end of the brooder. If one burns out, the other will help maintain heat in the brooder. In a classroom, two 25-watt bulbs usually will produce enough heat. If more heat is needed increase the size of the bulbs (One bulb at a time).
- Place a layer of newspaper about five pages thick in the bottom of the brooder and cover with two layers of paper towel. This will keep the chicks from slipping and hurting their legs.
- Add a waterer and feeder, and your brooder is ready for the chicks.
The temperature at chick surface should be 95°F for the first week, then decrease the temperature by 5 degrees F per week by decreasing the light bulb size. Use two light bulbs on the heated end of the brooder. If one burns out, the other will help maintain heat in the brooder. In a classroom, two 25-watt bulbs will usually produce enough heat. However, adjust the size of the light bulbs to regulate the temperature.

