Posted: April 21, 2021
Master Gardener of Montgomery County, Rick Ross, offers step-by-step instructions so your wooden garden posts are plumb and remain that way.

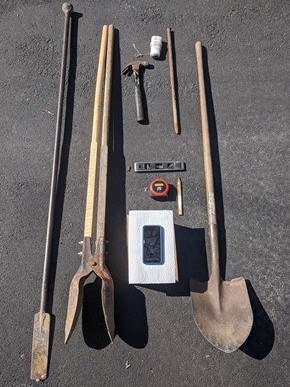
Tools for fence post installation
Instructions for installing a post for a fence and/or a gate.
These are specifically for setting a wood post, for example a 4"x4", a 5"x5", a 6"x6" post, or a split rail post.
Note: there are different requirements for setting a metal or a PVC post.
Tools needed
- Post hole diggers
- Digging/tamping bar
- Tape measure
- Marker
- Level
- Shovel
- Phone
Optional: * string line, * stakes
Why a phone?
Diggers are responsible for ensuring that where and when they dig is safe. In Pennsylvania, you must call 1-800-242-1776 (PA One Call) to have any public utilities marked before digging. You're required to call 3 days in advance of the excavation. Note: Pennsylvania One Call will mark public utilities but not private lines. For instance, water, gas, or electric lines running from a primary building to a barn, shed, or pool will not be marked.
Tip: usually, but not always, lines run from the main building to an outbuilding in a straight line, but the only way to be sure is to have an electrician, a plumber, or a gas supplier locate and mark the line.
If more than one post is to be set, set up a string line between holes to make sure posts are set in the same plane.
Digging the hole
A hole can be dug with a shovel, but a pair of diggers and a digging bar make the job infinitely easier. Both can also be used to plant flowers, shrubs, and trees. Some tool and garden centers rent them, but a one-time investment will last a lifetime for most homeowners.
Posts that are 4"x4", 5"x5", or 6"x6" should be installed at least 30" underground. A split rail post should be installed around 27" deep. Posts are "set" at this depth to prevent them from heaving when the ground freezes. "Heaving" will push posts upwards and/or out of plumb, meaning they will no longer be straight or at the right depth.
When digging the hole, place the excavated soil in a single pile next to the hole. If the soil is spread out, it'll be more difficult to put back.
The most important consideration is to dig a cylindrical hole 4 inches wider than the post all the way around; this is critical to make sure there is enough space around the post so that you can tamp soil without moving the post.
Next, measure 30" from the bottom of the post and draw a line across the post to ensure that it will be buried to the proper depth in the hole, which you can see in illustration B. The mark should be level with the ground and will just touch the string line if you are using one. (See illustration C.)
Once the post is at the proper depth and plumb, shovel a small amount of soil all around the post and, with the tamping bar (the rounded end of the digging bar), tamp straight down without moving the post. This will secure the post in place. Now check again for plumb on two adjacent, not opposite, sides of the post. Continue to return small amounts of soil as you tamp straight down and continue to check for plumb until all the soil has been returned.
This author does not recommend concreting the post for reasons too long to get into in this article. However, a small amount of premix concrete mix, available at hardware and box stores, can be mixed with the soil to "stiffen" the soil. Use two full shovels of premix concrete and mix thoroughly with the soil for each hole.
Source: Rick Ross, a Montgomery County Master Gardener, owned and operated the Heritage Fence Company for 30 years and installed thousands of fences for businesses and homeowners.

